
Fit Forge: resizing an STL to your body
Somebody else modelled that helmet on somebody else's head. Upload the STL, pick what it is, and Fit Forge scales it to your measurements in your browser.
On this page
Most cosplay STLs on the internet were modelled on the maker's own head, or on nobody in particular. Fit Forge takes one of those files and scales it to your measurements before you spend forty hours of printer time on it.
Using it
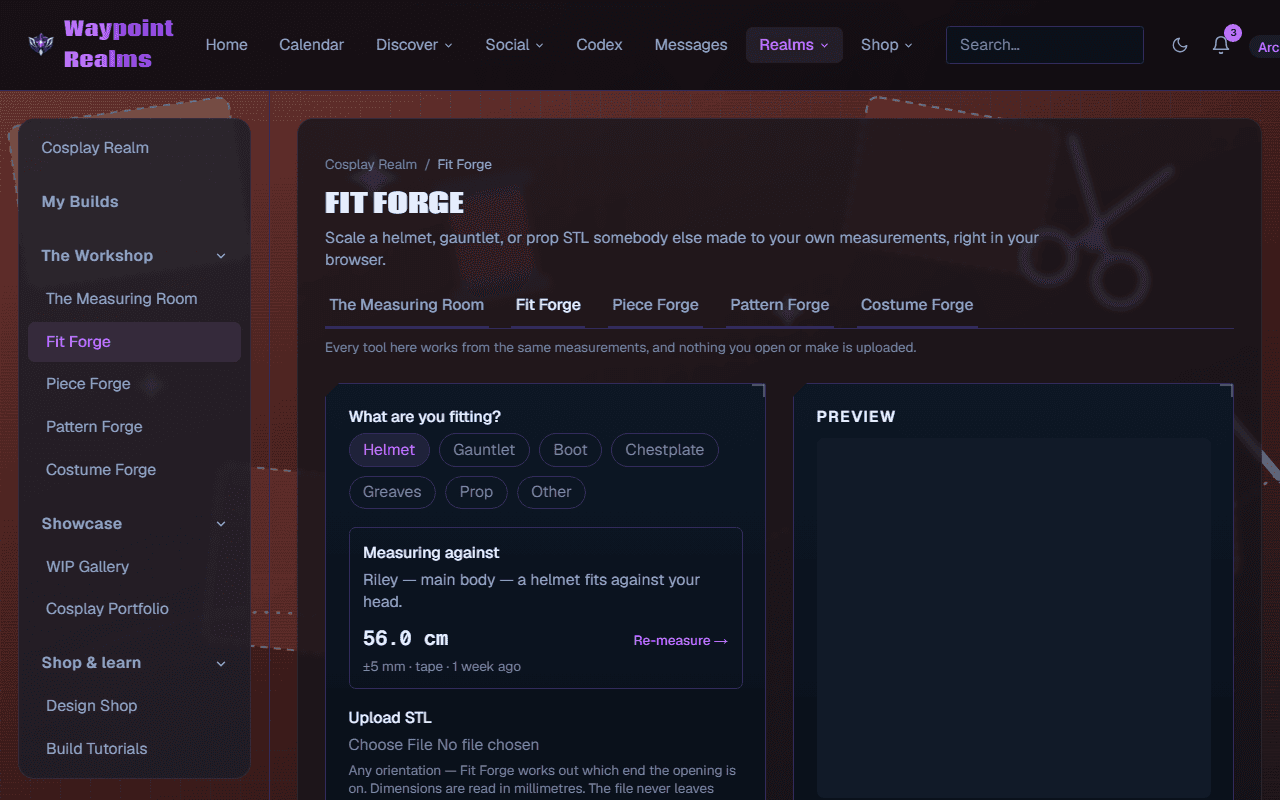
Say what the piece is
Helmet, vambrace, boot, chestplate, greaves, pauldron, bracer, mask, belt, back plate, prop or other. This is not a label — it is how the forge knows which measurement has to clear. A helmet or mask is fitted against your head circumference, a vambrace or bracer against your forearm, a chestplate or back plate against your chest, a belt against your waist, boots and greaves against your calf. A pauldron, prop or other piece has no one body measurement, so you type the circumference you want.Check the body it is measuring against
The card names the profile, the measurement that piece needs, how sure it is, how it was taken and how old it is, and warns when it is older than you asked to be reminded about. If the measurement is missing it says not measured, and Measure it → (Re-measure → once there is one) opens the Measuring Room; its Back to Fit Forge → link returns you, with the same build piece picked. The model isn't kept, so upload it again. The profile menu shows only when you have two or more. With no profile, type a target instead.Upload the model
Under Upload a model: an STL (binary or ASCII), an OBJ, a 3MF or a glTF (.glb), in any orientation. STL and OBJ files carry no unit, so they are read in millimetres — except an OBJ so small it can only be in metres, which Fit Forge reads as metres and says so. 3MF and glTF say their own unit. Fit Forge tells you roughly what circumference the file fits as it is.Check the fit axis
Fit Forge works out which axis the piece is worn along and which end the opening is on, and says what it detected. If it is unsure it says so. Pick X, Y or Z yourself, or flip which end the opening is at, whenever the reading looks wrong.Set the fit
The Target … circumference (cm) starts from your measurement. Fit band is how much of the model scales, from 20% to 100%: low, and only the rim around the opening resizes while detail further in stays put; at 100% the whole model scales. It starts at 60%. Wearing clearance (cm) is the gap between the shell and you — padding, a wig, or room to move — from 0 to 5 cm, starting at 0.2 cm.Or fit a helmet by length and breadth
Heads aren't round, and two heads with the same circumference can be very different shapes. For a helmet, choose Length and breadth: the opening is scaled front to back to your head length and side to side to your head breadth, so a long, narrow head gets a long, narrow opening rather than a bigger circle that gapes at the temples. Measure both in the Measuring Room — two books and a tape; find Head length and Head breadth there and use Enter by hand. If a visor or jaw guard makes the opening widest side to side, tick the box that says so. With your head height measured, you can scale the helmet's height to your head as well; otherwise it keeps its height.Preview and download
Preview scaled shows the piece upright, with a mannequin from your profile for scale (the Body box hides it), and says what percentage of the file's size it is scaling to. Switch between Original and Scaled, and orbit or zoom to check it. Changing any setting clears the scaled preview, and download waits until you preview again, so the file you save is always the one you last looked at. Download scaled STL saves it for your slicer; Download scaled 3MF saves the same mesh as a 3MF, which carries its unit (millimetres) and the file's name with it. Downloading needs Pro; on Free and Plus a link to Pro takes the place of the download buttons, and you can scale and preview as much as you like.Check the walls
Scaling a piece down thins its walls too, and a wall thinner than your nozzle can lay down prints weak or full of gaps. After Preview scaled, Fit Forge measures the scaled walls and says how thin the thinnest is. If more than a sliver of the surface is under your Minimum wall (1.2 mm to start — three passes of a 0.4 mm nozzle), it warns you before you download. On Pro, with a filament or resin chosen in the Live BOM, it also gives a rough print time (and, for filament, how much it takes); your slicer has the exact figures.Print a test ring first
Download a test ring saves just the first 10 mm of the scaled piece from its opening — the band that sits on you. It prints in about an hour. Try it on: if it fits, the full print will; if not, change the target or clearance and preview again before spending a day on the whole thing. The test ring is a download, so it needs Pro too.Or unfold it for foam
Unfold to foam templates cuts the model — scaled, once you have previewed a scale — into flat pieces for foam or card, with seam numbers, bevels and glue tabs, as print sheets, cut files or a projected image. Unfolding and projecting are open to everyone; the print sheets and cut files need Pro. See Print and cut foam templates.Split it for your printer
Too big for your bed? After Preview scaled, under Split for your printer, pick your printer (or type its build volume) and how the parts join — 1.75 mm filament, printed 4 mm pins, 6 mm wooden dowels, or No pins — I'll glue it. Split into parts cuts the scaled model into as few parts as fit, closes every cut face, and drills matching holes into both sides of each cut where the wall is thick enough for a pin. Where it isn't, it says to glue that joint. Download the parts as a zip — one STL each, a note of how they go together, and with printed pins the pin to print — or as one 3MF. Splitting works on every plan; downloading the parts needs Pro.
Recent fits
Every download is listed under Recent fits: what the piece was, the file name, the scale as a percentage, the target, the fit band, the clearance and the date. They are the settings to make the same fit again — not a copy of the file.
Attaching a fit to a build
Attach to a build component (optional) appears once a model is loaded. Pick a piece from one of your builds, or add a new one with + New piece on a build. Arriving from Fit › on a build picks the piece for you. After you download, the build lists the fit against that piece; on Pro it also sets the piece's estimate.
Costing the print
On Pro, the Live BOM prices the piece: choose a material and set the infill and wall thickness (or the cutting waste, for sheet materials), and it estimates the cost of the original and the scaled model from the mesh itself. It is a planning figure, not a supplier quote. With a build piece attached, downloading also sets that piece's estimate. Scaling and previewing are open to everyone; the Live BOM and every download are Pro.
If you are making the piece from scratch
Fit Forge resizes a model somebody else made. To model one yourself — and unfold it into foam templates — use Piece Forge instead.
Was this helpful?